
Carlos Eduardo Francci, Alexander Cassandri Nishida, Ezequias Costa Rodrigues Júnior, Camila Rivoli Kiyohara, Pedro Paulo Albuquerque Cavalcanti de Albuquerque, Guilherme de Siqueira Ferreira Anzaloni Saavedra
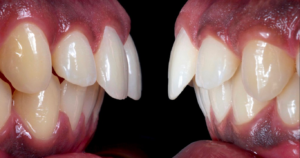
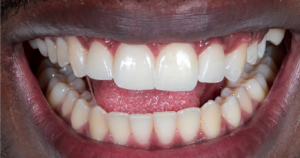
32-year-old male patient.
Dissatisfaction with his smile due to several interdental spaces in the upper anterior teeth.
The presence of diastemata was noted in the region of the central, lateral and upper canines.
Due to the search for an immediate solution to the patient’s case and a good oral hygiene condition, ceramic veneers were chosen to improve the smile with: four veneers (12 to 22) and two ceramic fragments (13 and 23).
“An excellent material such as Allcem Veneer APS allows us to be sure about shade selection, not only because of the use of an adhesive system without the natural yellowish shade caused by the presence of camphorquinone, but also due to the shade fidelity that the new APS photopolymerization initiators provides. This technology also allows us to have highly predictable results and therefore higher patient satisfaction.”
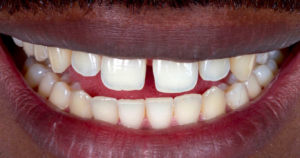
1a a 1c. Initial condition of the case after supragingival scraping and prophylaxis.
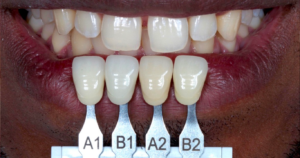
2a e 2b. Shade taking.
3a e 3b. Mock-up installation with bisacrylic resin according to waxing done in a model. This step allows the patient to preview the final aesthetic result,
with the possibility of minor adjustments and corrections. With the approval of the new smile aesthetics by the professional and the patient, the teeth preparation phase began.
4a e 4b. Dental preparation guide in silicone created on the waxed model and adapted to the teeth already prepared, showing the amount of wear obtained.
In this case, the modified prepless technique was used, where a cervical preparation of approximately 0.2mm was made on the gingival line with a round-tipped
cylindrical diamond tip (KG Sorensen) mounted on a contra-angle multiplier with a rotation of around 50,000rpm, allowing precision and delicacy.
In the proximal ones, a preparation of 0.2mm was also carried out with a long conical diamond tip. The preparations were carried out on the mock-up in
position with the aid of “silicone guides” that allowed the precise and conservative wear necessary for the ceramics. These preparation guides allow checking
of the worn thickness in the different regions, avoiding the unnecessary removal of healthy structure.
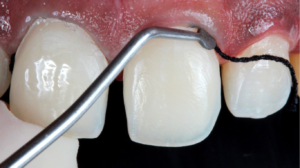
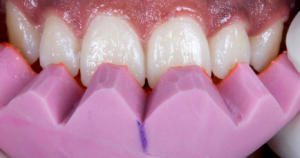
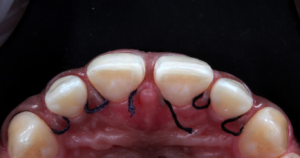
5a a 5c. Insertion of the retraction cord continuously and mold obtained in addition silicone (double-molding technique), with a true copy of the cervical finish lines of the preparations.
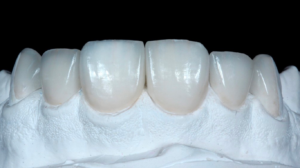
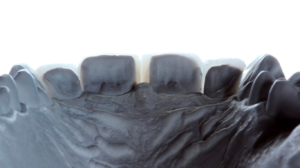
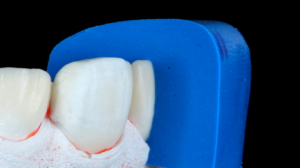
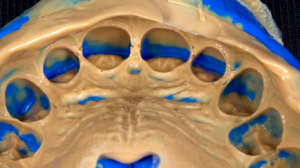
6a e 6b. No-prep veneers and ceramic fragments on the plaster model, in vestibular and palatal view.
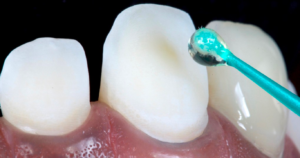
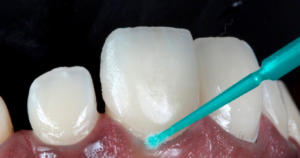
7. Dental prophylaxis to promote an adequate substrate for the adhesive procedure.
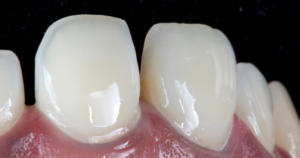
8. Dry proof of pieces for an adaptation check.
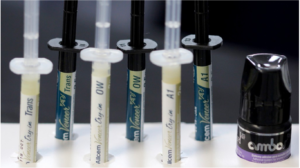
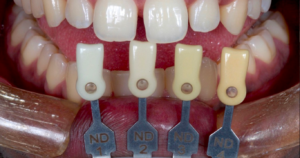
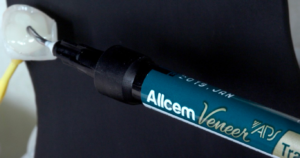
9. Allcem Veneer APS system with Try-in cements and pastes and Ambar APS adhesive.
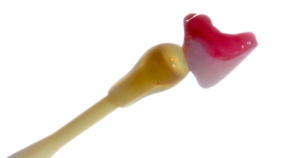
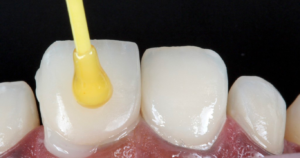
10. Test with Try-in pastes of different colors: OW (opaque white) on tooth 21 and A3 on tooth 11. The influence of cement color on the final aesthetic result of
the tooth is evident, so the professional should have an adequate range of colors to choose from at their disposal. In this case, after the consent of the patient,
the color TRANS (translucent) was chosen for cementation.
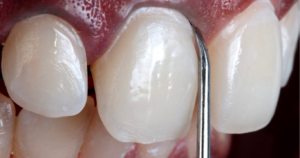
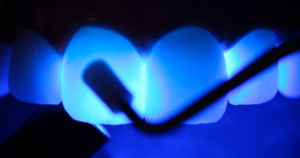
11a e 11b. Etching of the pieces with hydrofluoric acid at 10% (Condac Porcelana) for 20 seconds. It could also be etched with Condac Porcelana 5%. After careful
washing with water, application of 37% phosphoric acid (Condac 37) for 30 seconds for removal of the silica deposits created during etching, drying and
application of silane (Prosil) for 60 seconds, one must wait for 1 minute for the solvent to evaporate.
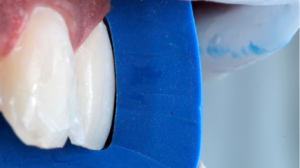
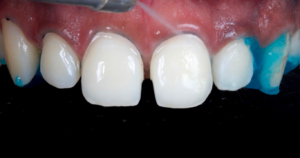
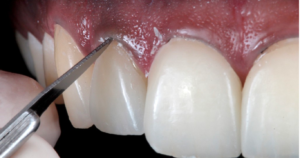
12a e 12b. At the cementation stage, teeth receive a continuous retraction cord to expose the cervical finish lines properly, control the moisture from gingival
sulcus and facilitate the removal of excess cement within the gingival sulcus after light curing.

13a a 13c. Dental preparations being etched with 37% phosphoric acid (Condac 37) for 15 seconds. After washing for 30 seconds and drying, an opaque and frosted
appearance of the enamel is obtained.
14a e 14b. Application of dental adhesive (Ambar APS), with a practically colorless appearance that does not interfere in the final color of the work.

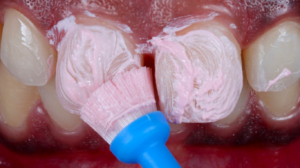
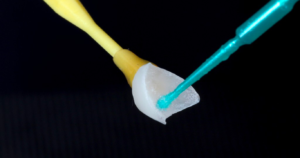
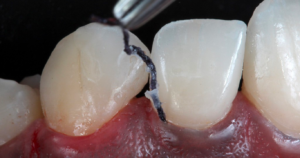
15a a 15d. Application of resin cement (Allcem Veneer APS) on the internal surface of the pieces and carefully placing them on the preparations. Cement overflows
on all sides, indicating adequate filling of the tooth-restoration interface. In the canines, where ceramic fragments were cemented, an “adhesive continuity zone” 4
was created on the buccal side with the resin cement itself, in order to mask the junction between the ceramic and the dental enamel. Excess cement is removed
with a disposable micro-applicator (Cavibrush) on the buccal surfaces and with dental floss at the proximal interfaces, always towards the palatal surface.
16. Light curing for 40s (with 1.000 mW/cm2 power).
17. Removal of excess cured cement with a scalpel blade nº 15.
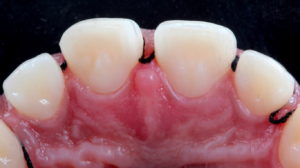
18. Removal of the gingival retractor cord starting with the palatal loops, once the cord has been continuously installed.
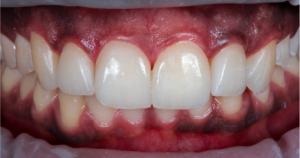
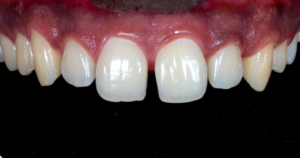
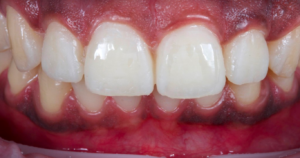
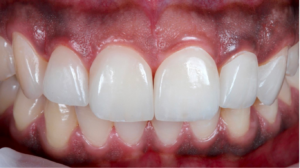
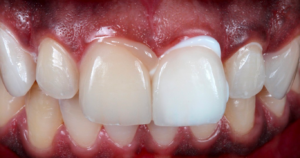
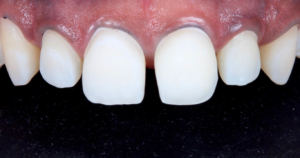
19a e 19b. Final appearance of the clinical case immediately after cementation.
WAY BEYOND A COLORLESS ADHESIVE SYSTEM Does the color of the adhesive interfere, in a relevant…
Authors: Dr. Andréia Luiza Gabriel Dr. Rodrigo Reis Adhesive systems have revolutionized esthetic dentistry, allowing for…
Dentistry is in constant evolution. Besides caring for oral health, the world has been seeing tools…
Dr Fabio Lorenzoni The patient came to the dental office, reporting the frequent falling out of…
Authors: Dr. Jéferson Fagundes Patient gender and age: Female patient, 67 y.o. Chief complaint: Absence of tooth 12…
Profª. Jiuliani Radünz, Prof. Dr. Bernardo Born Passoni, Prof. Antônio Neves, Profª. Caroline Freitas Rafael, Profª.…


