
Dr Fabio Lorenzoni
The patient came to the dental office, reporting the frequent falling out of the provisional crown of tooth 21, which had a provisional post cemented inside the root canal.
A White Post DCE 2.0 fiberglass post was used, cemented with Allcem Core and Ambar Universal as the adhesive system. The fiberglass post sleeve was reconstructed with Vittra composite DA2 .
Subsequently, the patient requested tooth whitening.
Then, a treatment plant was established involving the cementation of a lithium disilicate crown on tooth 21, with teeth 13, 12, 11, 22, and 23 receiving the cementation of veneers made with Brava Block color LTA2.
The veneers were cemented with Allcem Veneer and the crown was cemented with Allcem Core. The adhesive used was Ambar Universal in both cases.
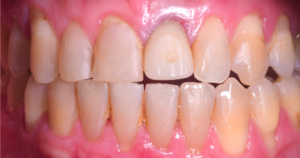
Fig. 1. Initial frontal clinical image. Note the lack of finishing and polishing of the buccal surfaces of the anterior teeth (the patient had removed the orthodontic brackets a few days ago) and quality of the provisional crown.
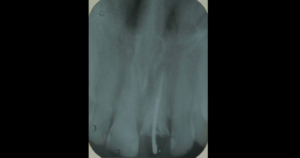
Fig. 2. Periapical X-ray image where it is possible to observe that this tooth had a temporary metallic post cemented in the root canal, which needed to be replaced.
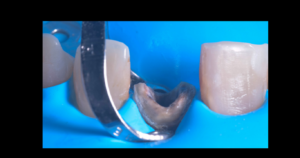
Fig. 3. Frontal image of the coronary remnant (quite darkened) after the removal of the provisional crown and the provisional metallic post.
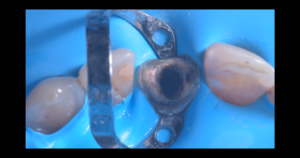
Fig. 4.Incisal image of the coronary remnant. Note that the root canal (especially in the cervical third) was quite wide. The prosthetic preparation of the coronary remnant was performed before cementation of the fiberglass post.

Fig. 5. Periapical X-ray image showing the unobstructed depth of the root canal.
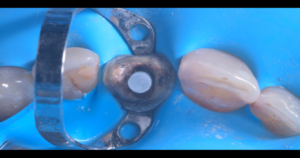
Fig. 6. Incisal image where it is possible to observe the relationship between the walls of the White Post DC-E 2.0 fiberglass post and the inner walls of the root canal, especially in the cervical region. Note that the thickness of the cement line will be reduced due to the larger diameter of this fiberglass post, since the White Post DC-E posts have a larger diameter in their cervical portion, when compared to the White Post DC posts.
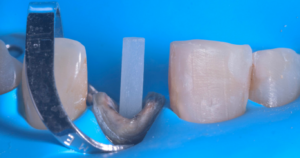
Fig. 7. Front image where it is possible to see the relationship between the fiberglass post and the coronary remnant.
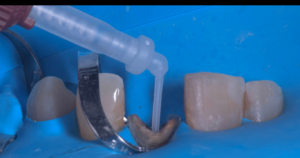
Fig. 8. After etching with Condac C 37% phosphoric acid (FGM) in the root dentin for 15 s, followed by washing this acid for another 15 seconds with water, the root dentin was treated with the Ambar Universal APS Adhesive System, with an active smear for 20 s (repeated twice). After evaporating the solvent and removing excess adhesive with an absorbent paper cone, the adhesive was photoactivated for 40s. After that, the dual resin cement Conventional AllCem Core was applied inside the root canal through its applicator tip. Subsequently, the fiberglass post was inserted into the root canal and after removing the excesses, the cement was photoactivated for 40 s, both on the buccal and palatal surfaces.
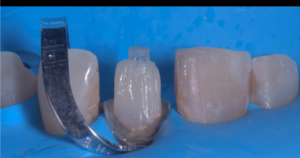
Fig. 9. An abutment was constructed with Vittra APS DA2 composite resin. This abutment followed the principles of retention and stability of prosthetic preparations.
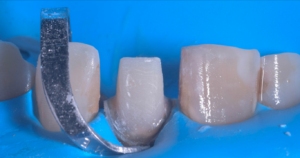
Fig. 10. Still with rubber dam isolation, the tooth was prepared following the prosthetic principles. Care must be taken as some rubber dikes produce a large tissue retraction and this can disorient the professional regarding the allocation of the preparation margin inside the gingival sulcus. Therefore, it is recommended to insert the intrasulcular margin after removing the rubber dam.
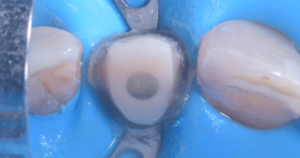
Fig. 11. Incisal view showing the palatal face of the prosthetic preparation.
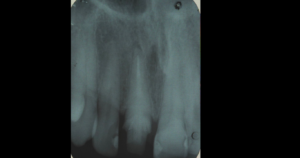
Fig. 12. Periapical X-ray image after cementation of the fiberglass post.
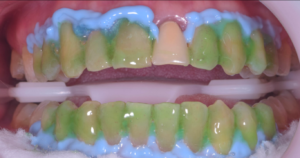
Fig. 13. The anterior teeth were polished and later whitened with Whiteness HP.
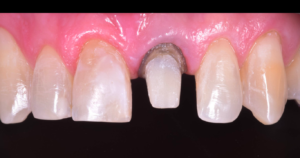
Fig. 14. Frontal image showing teeth 13, 12, 11, 22 and 23 prepared for veneer and tooth 21 prepared for full crown. The veneer preparations were minimally invasive.
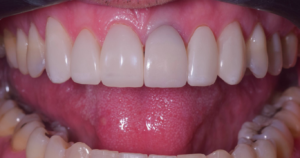
Fig. 15. Front image of laminates machined in Brava Block LT A2 and the crown machined in E.max Cad LT A1, which was later pigmented to obtain similar colors between resin and ceramic. Note that even when using low translucid ceramics, it was still possible to observe a grayish tone in the cervical region of the tooth, which is related to the extreme darkening of the root.
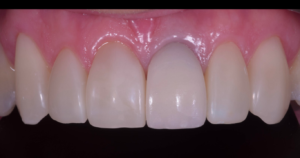
Fig. 16. Frontal image after cementing laminates with AllCem Veneer APS cement in shade OW. The cementation of the crown was carried out with the conventional dual resin cement Allcem Core in the shade Opaque Pearl.
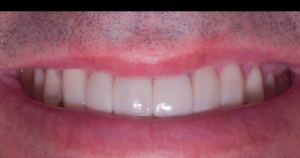
Fig. 17. Frontal image with the lip at rest where it is possible to notice that the grayish darkening is not visible. Also, note the similarity of the final color obtained with the combination of ceramic and composite resin.


